Battle Bunnies have some pictures of the new models and some artwork. Very nice! The revamp of the Rogue Trader Crusader robots are also really interesting to see.
Showing posts with label Malfian Crusade. Show all posts
Tuesday, 9 September 2014
All quiet on the South Eastern front
Just in case you're wondering, I'm not dead and projects havn't stopped... I'm working on a few bits behind the scenes that are all in concept phases at the moment and not really ready for public consumption. I've got next week off and we're going to try and spend the week doing craft bits, so hopefully there will be some painting updates *fingers crossed*
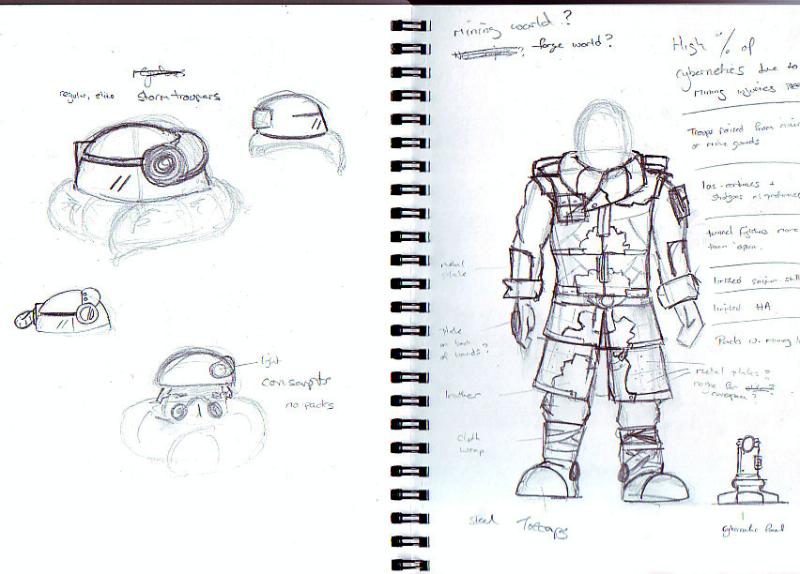
After the lackluster Imperial Guard release and the new edition of 40k I went off GW and their ever increasing prices. I wasn't expecting anything to come out that would change my mind here, but the curse that is Forge World are working on some really nice new Guard that work with the miner theme that I originally wanted to have for my force. Sometimes I miss working on the force... Now I'm not actually playing, I might try to make the effort to go back and neaten up some of the units. Who am I kidding? I've far too many other ideas floating around to worry about something that is already battle ready! Would really love to get some of my designs (right) actually made one day though.
Battle Bunnies have some pictures of the new models and some artwork. Very nice! The revamp of the Rogue Trader Crusader robots are also really interesting to see.
Friday, 28 June 2013
Scruffy tank
Over the last few years GW have been pricing themselves out of my (and many other people's) gaming budget as well as doing other very strange things to the community like threatening fan sites. The one thing they have been doing well recently though are their Masterclasses. These are 1 day courses run at GW HQ with a couple of their painting or sculpting teams. I've now been on three of these, Forgeworld Tank Weathering, Eavy Metal Painting and Introduction to Sculpting. Each came with a complete kit, all the materials, lunch, training and all the coffee/tea/biscuits you can consume in 1 day.
The Weathering Masterclass was probably my favourite as I had an immediate use for that one as I was working on my Chimera and this Demolisher. I know I have a various step by step guides that I wrote afterwards. When I find them, I'll upload them here
Friday, 21 June 2013
Inquisitorial assistance
The Inquisitor I showed yesterday is accompanied by his loyal follower, T020. In game he counts as a death cultist... what else could he possibly be?!
The model is from last year's Forge World show only Enforcer model. It's a really nice dog model with some weird bits and pieces embedded into the poor thing. It pretty much painted itself in the space of an hour or so with a white undercoat and a series of brown and black washes.
Thursday, 20 June 2013
Inquisitor
Speaking of inquisitorial forces (or at least I was yesterday with the servitors) When the first plastic warhammer character blisters came out, Dakka held a competition to convert one of them into a 40K figure. You'll have seen similar cross-system conversions done in White Dwarf with the Blanchistu column since; though most of the ones in that column seem to be made from the nurgle lord, rather than any of the first round of models.
I attempted two for the competition, but only the inquisitor was completed as I didn't quite get the other one to work as expected. Maybe I'll go back and revisit it one day when there's nothing else to paint*
I'm happy to say that I actually won the public vote with my Inquisitor; though a lot of the other models were brilliantly converted and painted. I've not seen so many brilliant ideas in one thread before. This guy started life as the Warriors of Chaos sorcerer lord. Now he fights against evil in all it's forms.
*So that'll be never then!
Wednesday, 19 June 2013
Servitors
I seem to have acquired a large number of servitor models over the last couple of years... I think Arakasi and his Big Mek conversion may be to blame for that one. Both my Imperial Guard and Inquisition forces utilise servitors in one guise or another... plus the metal ones are great fun models to paint. The first two painted up very quickly indeed...
Monday, 17 June 2013
Tanks, tanks... everywhere it's tanks!
With an Imperial Guard force you just know it's going to be full of tanks. Rather than posting all of the Chimera separately, here they are in one big batch. They are all done using a variation on the normal Chimera pattern and seem to get lots of positive comments whenever they come out for a game.
So how do you get that setback look to the top part? Here's a tutorial I wrote earlier! This works on the old and new Chimera bodies as the majority of the changes to the kit were combining a few of the side pieces together into one.
The first step is easy. Build the Chimera chassis as normal, leaving off the top, until you get this far

Take this piece

And cut the corners off, so it looks like this

Fit the place onto the top of the tank, just behind the main cab

Next we need to cut down the top. Place your saw just behind the first to viewports and using them as a guide... cut the back part off.


Before discarding the back part, we need the two sides. So carefully cut these off

Stick the in place and file them down so they are level with the top of the tank. I tend to stick the back door on to make sure the sides are correctly aligned.

Shave off the 6 rivets that look white as these get in the way of sticking the top on.

Before sticking the top on, we need to deal with the two lasgun ports. I never liked the lasguns, so reverse two and glue them in place as two view ports instead.

Once the top is in place it'll look like this

As we're using the turret ring/hatch on the front of the tank, we need to cover up the hole in the turret. Glue some plastic card over the top and trim/sand it down so that it fits seamlessly.

Use any bags, boxes or barrels that you have to neaten up the tank and make it look used. Also use it to cover up the open part of the hatch on the back.

You are now all done.
So how do you get that setback look to the top part? Here's a tutorial I wrote earlier! This works on the old and new Chimera bodies as the majority of the changes to the kit were combining a few of the side pieces together into one.
The first step is easy. Build the Chimera chassis as normal, leaving off the top, until you get this far
Take this piece
And cut the corners off, so it looks like this
Fit the place onto the top of the tank, just behind the main cab
Next we need to cut down the top. Place your saw just behind the first to viewports and using them as a guide... cut the back part off.
Before discarding the back part, we need the two sides. So carefully cut these off
Stick the in place and file them down so they are level with the top of the tank. I tend to stick the back door on to make sure the sides are correctly aligned.
Shave off the 6 rivets that look white as these get in the way of sticking the top on.
Before sticking the top on, we need to deal with the two lasgun ports. I never liked the lasguns, so reverse two and glue them in place as two view ports instead.
Once the top is in place it'll look like this
As we're using the turret ring/hatch on the front of the tank, we need to cover up the hole in the turret. Glue some plastic card over the top and trim/sand it down so that it fits seamlessly.
Use any bags, boxes or barrels that you have to neaten up the tank and make it look used. Also use it to cover up the open part of the hatch on the back.
You are now all done.
Saturday, 15 June 2013
Imperial Tauros
Do you get the feeling I like Forge World's models rather than the main GW ones? I've never been a massive fan of the Sentinel concept, though I do have to say that the plastic version is significantly better than the easter egg design in Rogue Trader or the boxy chicken in 2nd edition... anyway.
When the Tauros was announced, this suited me perfectly as a stand-in
Wednesday, 12 June 2013
Imperial Beastmen
Many many moons ago, back in the Rogue Trader days, the Imperial Army (in it's pre Imperial Guard days) used to be able to take some weird and wonderful unit choices, such as the Commissar training squad and loyal Beastmen squads. Their removal still saddens me a little, so when I started to piece together a guard force for the 5th edition codex, I decided to resurrect them as they fitted the Penal Squad perfectly with the vicious random nature to their skills.
Here they are, posing nicely on some terrain at Warhammer World
The conversion combines the Ungor plastics with torsos and arms from the Catachan kit for quite a nice rough looking squad. The painting isn't the best as they were done in a hurry for a tournament*... still. One day I may go back and clean them up a bit.
*All that can be said about that is "At least I didn't come absolutely last" ;)
Subscribe to:
Posts (Atom)