I mentioned to
Mathyoo that I would put up something about weathering powders, so here's something I wrote on another forum a few years back after going on the Forge World Tank Masterclass day, updated slightly with some clearer descriptions (writing isn't my forte).
The Masterclass was run by Phil Stutcinskas and Mark Bedford, who took us through some of the may tips and tricks that they
use to paint tanks for the Imperial Armour books.
It became a running joke throughout the day that Phil and Mark
obviously had shares in Gloss Varnish as he uses it for nearly every
technique they took us through. Annoyingly the shop in Warhammer World hadn't been aware
of this and didn't have any stock.
As part of the event costs we were given a built, undercoated Hellhound so we didn't need to waste time constructing a model to them paint. Seeing everyone take the same model in different directions was as useful as the proper guidance.
 Waterslide Transfers
The first thing they took us through was how to apply transfers so
that they don't peel off and don't look fake. I've avoided using
transfers for ages as I could never quite get them to sit right on a textured vehicle; they always have a slightly silvery look and had a visible edge. The trick to
fixing both these is magic. Well, not really. Before applying any transfers,
give the area you want to apply the transfer to a thin coat of gloss varnish; this give you a nice
smooth surface to work with, which removes the silvery finish. It turns out that that is millions of tiny air bubbles caught underneath the decal, which not only visibly changes the quality, but causes it to flake off over time.
After you've
placed the transfer and let it dry, paint another thin coat of varnish over the top to seals it all, so it's never
coming off. This varnish also smooths out the raised edges of the
transfer a bit too, making it blend into the model. If you still have a visible edge, apply some more gloss varnish along the edges to try and level it all off. For curved or textured surfaces they suggested looking at the Sol and Set decal fixatives, but I've not had the chance to try those yet. Transfers should be done before any weathering as they represent the factory fresh vehicle.
Chipping paint
Chipped paint was next up on the agenda. I've tried to do chipping
with a sponge before, but never got it looking nice enough. Previously I'd just been stippling on the darker colour for the metal. What I should have been doing is a mixture of tones. The first step is a stippling of a lighter version of the base tank colour, so in this case a lighter grey. To get the worn tank look we don't want to go all the way down to bare metal as that isn't all that realistic, so we create a
mixture of dark brown and black to represent the undercoat and stipple that over the top of the lighter chipping.
Putting chipping over the transfers not only helps support the wear and tear effect we are going for, but also helps blend them into the mode
more effectively. I'd also been underdoing it and kept being told to add more…

You can also use the sponge for doing scratches by carefully dragging the nearly dry sponge along the surface.
 Grime
Grime
So far we've added markings and then wrecked the paintwork... but the remaining paint is all very clean... we need to start aging the tank by building up grime around rivets and joins. It's really quick to do and gives a really good start without having to worry about powders quite yet.
Tip 1. Forgeworld don't like Devlan Miracle, they think it's
too grey and takes the life out of models, so they use a mixture of
Gryphonne sepia and black for a richer, more vibrant brown.
Tip 2. In order to control the wash more effectively, and
give you more working time, don't just add water as this will separate
the pigments and give you a very odd look. Adding some of Magic, multi-tool Gloss Varnish to the mixture will create a slightly thinner version of the wash that won't
separate the pigments. You can also use gloss varnish to make washes out
of any other paints in case there isn't one for the colour you need.
When placing the wash onto the model, work on it one horizontal
plane at a time, letting it dry before moving on so you don't get the washes flowing down and creating
tide marks. Don't just slap on a thick layer of wash and hope, take it slowly and imagine the wash is a paint. For each area we washed it with the mixture and then use a
clean brush to carefully remove any excess from the larger flat areas.

By adding in oranges/yellows to the wash, you can start to create simple rust effects
around rivets
 Tip 3
Tip 3 If you've got a dark tank, don't make the washes
darker, it's unrealistic. As mentioned earlier, we can create washes with gloss varnish
and any paint, so with a nice sandy colour we can start to build up a lighter dust
around rivets and in crevaces instead. I haven't got a photo of this as
it doesn't show up very well on the light grey tank… but it's something
I'll try on my own later.
The main area that I wanted some help with was weathering powders
as I've not quite got the hang of this on my own. It turns out I was nearly
there... there are two ways that Phil and Mark use on the powders; each one gives a slightly different effect.

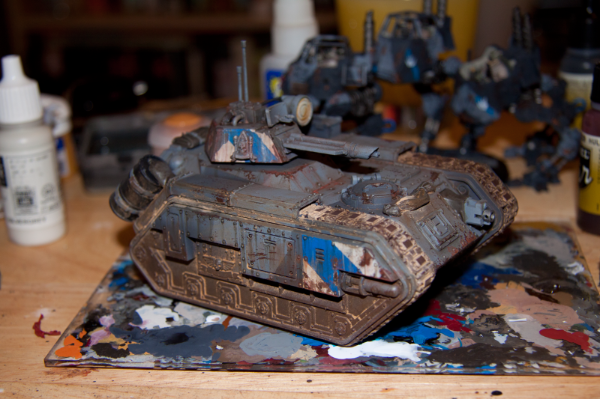
The first one (see the track area) is some gloss varnish (see, it
gets used for everything!) with some powder mixed in. This creates a thick, blobby mess that starts to look a bit like mud that can just be added onto the vehicle. While this goop is still wet, put some dry powder on in random
blotches so you get a mixture of tones. The wet varnish will soak into
this dry powder and stick it on.
The other way of doing it is to apply the powder dry and then
carefully put some white spirit onto the area (see rear panel above).
You can then use a clean brush and some white spirit to clean up any
areas that you don't want as much powder on as well as rubbing a bit off
with your fingers.
This will give you more of a stain, rather than a thick build-up.
A light coat of spray varnish over the top will seal it all on forever; though be careful as too heavy a coat will start to dissolve the powders and weaken the effect.
Tank tracks
Instead of building up thick layers of mud (as above), we may want to have a more dusty look to the tank tracks. To do this, paint your tracks a dark brown/black and then wash with a mixture of a light
sandy colour and… surprise! gloss varnish. Gently wipe off
the excess and you will be left with a sandy looking substance between the links.
Once the wash has dried, gently rub some of the Dark Iron weathering
powder (or graphite powder as that's cheaper) over the tracks to give
the raised surfaces a nice metallic look. You can do the same to all of the chipping on the main tank to give a bit of a metallic edge to the chips without using silver.

 Water stains
The last thing they went through was water stains and running oils.
Take a wild guess. Yep, you got it. Gloss varnish and whatever colour
you want to stain your tank with. Make this wash very very thin and just
do multiple layers, building up the layers.
It took a few attempts after the masterclass to get it looking right on my own, but here's an example of using all these techniques together on one model